
What Is SQL Developer
Introduction
This lesson will discuss SQL Developer, a popular Integrated Development Environment (IDE) for working with databases using SQL. SQL Developer is an open-source tool provided by Oracle. Database developers and administrators widely use it for its extensive features and user-friendly Graphical User Interface (GUI). We will also guide you through installing SQL Developer and setting up a connection to an Oracle Database.
SQL Developer: An Overview
SQL Developer is a tool that facilitates the development and management of Oracle databases using an intuitive graphical user interface. It supports a range of tasks and features, such as:
– SQL Scripting: Writing and executing SQL queries and scripts.
– Database Administration: Managing database objects and user accounts and performing other DBA tasks.
– Reports: Generating custom reports with database data.
– Data Import/Export: Importing and exporting data between different formats and databases.
– Debugging: Debugging stored procedures, functions, and SQL scripts.
– Data Modeling: Creating and managing database schemas using ER diagrams.
Being an Oracle product, SQL Developer has excellent support for Oracle databases but can also be used with other database systems through JDBC drivers.
Steps to Install SQL Developer
1. Create an Oracle Account: To download SQL Developer, you must have an Oracle account. Visit the Oracle website and create an account if you already have one.
2. Download SQL Developer: Go to the Oracle SQL Developer download page and download the compatible version with your operating system.
3. Install Oracle Database: SQL Developer is a client tool, and you’ll need an Oracle database to connect to. You can install Oracle Database 10g or a later version. Also, ensure you have the Sample Schema installed, as it can be helpful for practice and learning purposes.
4. Unlock the HR User: To access sample data, you may need to unlock the HR user. Open SQL Developer, log in as the SYS user (or another user with administrative privileges), and execute the following command: `alter user hr identified by hr account unlock;.`
5. Download Required Files: The instruction mentions downloading and unzipping a file named `files.zip`. This might be specific to a course or tutorial you are following. Ensure you have all the required files and resources for your learning process.
6. Setup SQL Developer: After installing SQL Developer, open the application.
Creating a Connection to Oracle Database
After installing SQL Developer, the first task is to create a connection to the Oracle Database. Here are the steps:
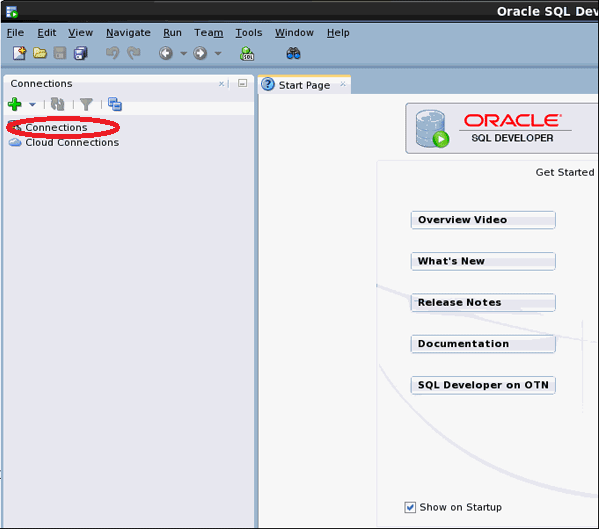
1. Open SQL Developer.
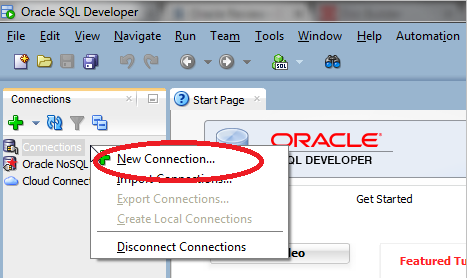
2. In the Connections tab, right-click on Connections and select “New Connection.”
3. Enter a name for the connection.
4. Provide the username and password. For example, you can use the HR user that was unlocked earlier.
5. Specify the hostname (usually `localhost` if the database is on your local machine), port number (usually `1521`), and SID or service name.
6. Click the “Test” button to ensure the connection parameters are correct.
7. Click on “Connect.”
You should now be connected to the Oracle database, and you can start creating and executing SQL queries, managing database objects, and using the other features that SQL Developer provides.
Conclusion
Oracle SQL Developer is a powerful and versatile database development and administration tool. It provides a wide range of features through an intuitive graphical user interface, making it an essential tool for anyone working with Oracle databases. In this lesson, you have learned what SQL Developer is, how to install it, and how to establish a connection to an Oracle database. This knowledge forms the basis for further learning and development using SQL and Oracle databases.
Steps to Create Database Connection:
1. Open Oracle SQL Developer.
2. Now under Connections, right click on the Connections and the Connection menu appears. Click on New Connection.
3. The New/Select Database Connection Dialog Box will appear.
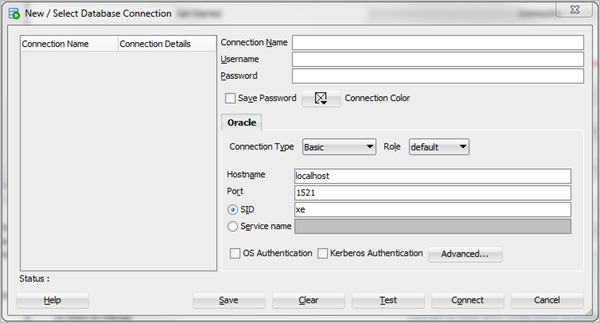
4. Enter the following details in the fields of the above-appeared dialog box.
- Connection Name: Name of Cloud Connection.
- User Name: Database Username
- Password: Your choice (then check the checkbox Save Password)
- Hostname: Your local hostname
- SID: Your own SID
- Then click on Test.
For example:
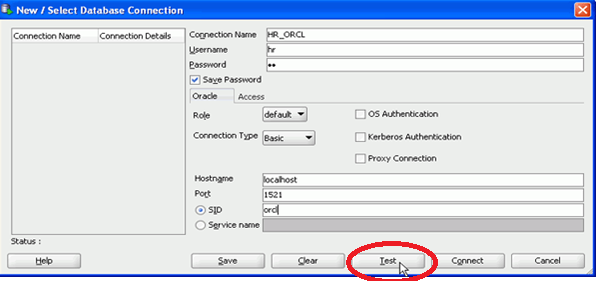
5. You can check the status of testing on the left bottom side. Then click connect and save.
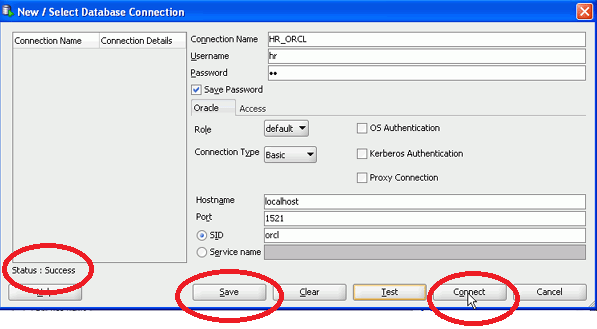
6. The connection would be saved and the new connection would appear under